Pages

Tuesday, April 20, 2010

Yayyy Earth! ~Outdoor Wednesday~

Since Thursday is Earth Day I couldn't resist joining in for this week's Outdoor Wednesday festivities. I spent much of this past weekend in my yard and enjoyed every minute of it. The dirt and the sun and the smell of the cottonwood trees all made me feel very appreciative of our beautiful planet. The spring blooms didn't hurt either!


Seeing this clematis blooming at my front door is a pure joy.


But I'm just as thrilled with the humble little violets


I love the unexpected blooms like these little anemones..I look and look for them in early spring, then suddenly when I least expect there they are.


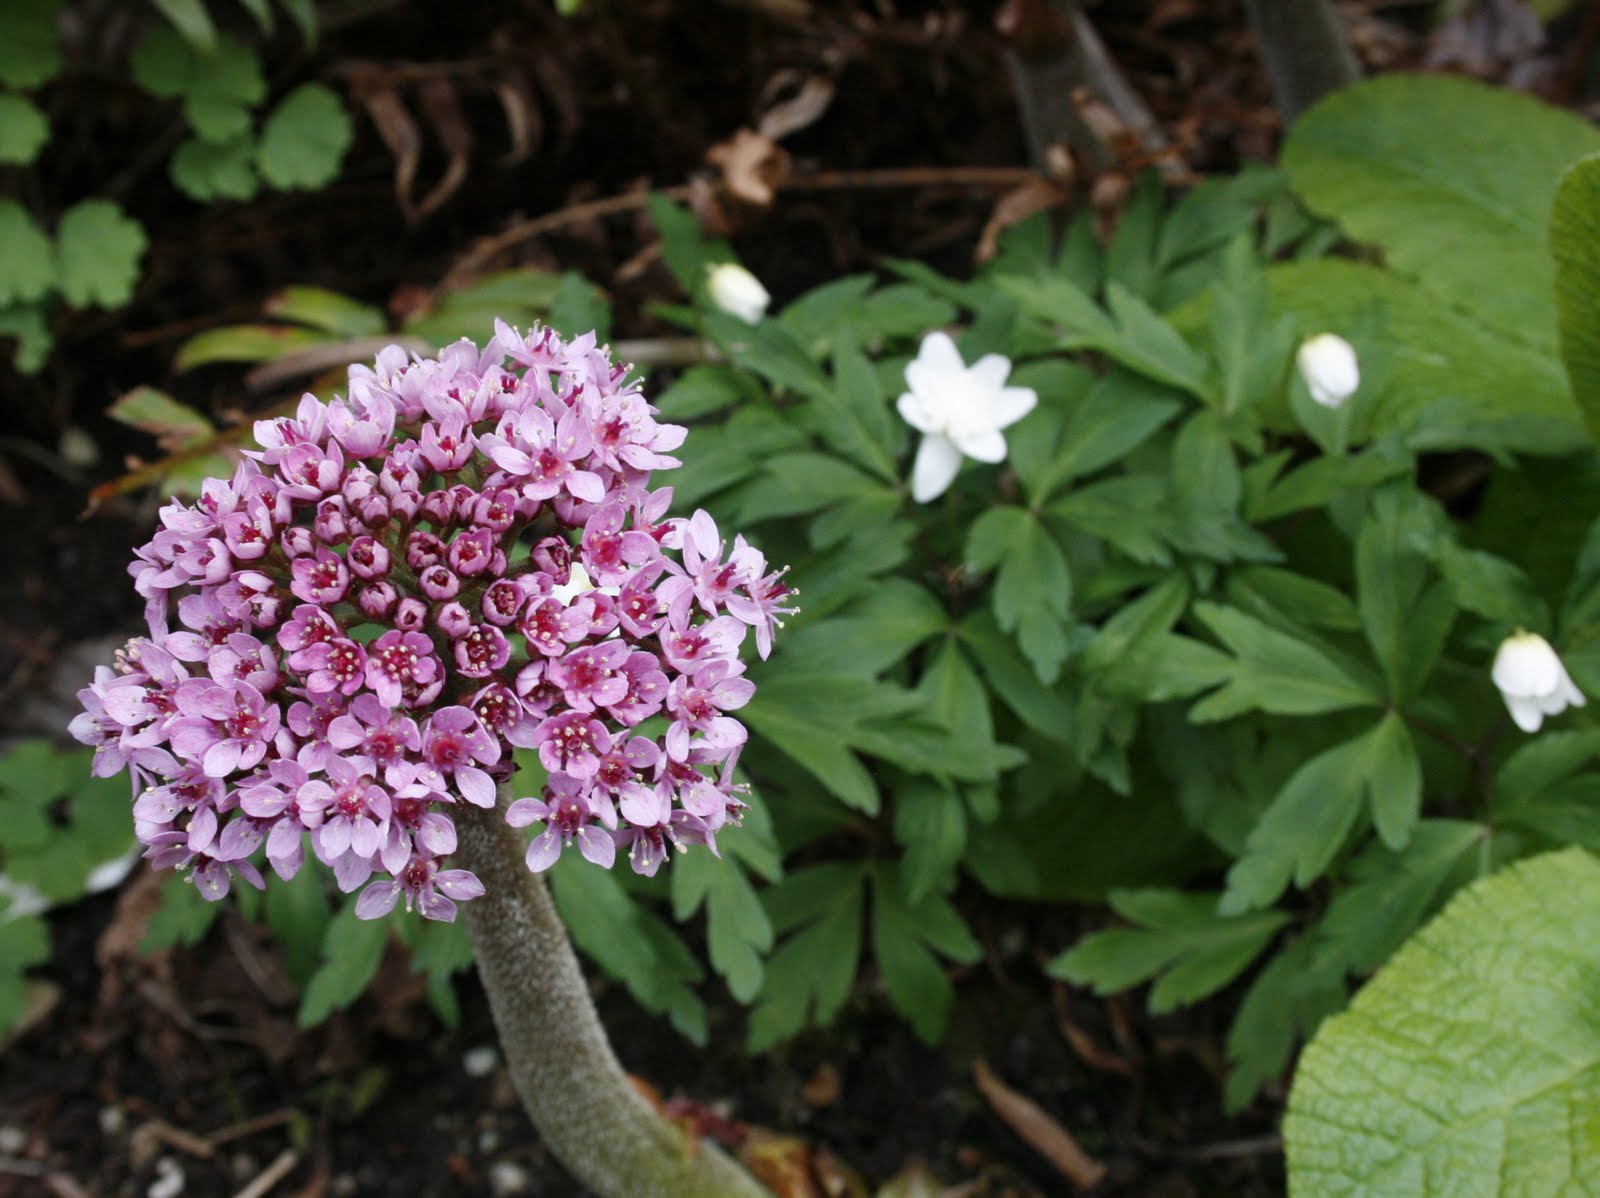
Or this startling Darmera peltata bloom...that comes up from the ground like a little alien hand..no leaves just flower!

Then there are the little tiny blooms that make their presence known in a big way. Forget me nots couldn't be forgotten even if you tried!


Signs of new life are everywhere you turn


Spring bulbs are still surprising me - I forget this ones name


But Spanish Bluebells I remember


Spring really is the season of love in the garden


And I love love love this bleeding heart to pieces


The rhody season is getting underway and this mini is the first to bloom in my yard.


But one of its azalea cousins is blooming too


I've just added this cutie to my garden. It's called lithodora "Star"


One of my favorite yellow flowers, trollius, is starting to bloom right now. It has such perfect little teacup shaped flowers. It reminds me of the one that Willy Wonka took a bite of :-)


Spring is a time when it reminds us of what the earth has to offer in the way of food. Apples on the way


Yummy green onions


And tomatoes hiding in their water beds


I'm always so excited to see this Mountain Bluet bloom! Saturday was the day this year


Even though I have plenty blooming in my yard at the moment I couldn't resist going to buy more....the fever has hit!


How could I not buy this pretty little fuchsia?


Or this otherworldly looking african daisy?


Hope all of you enjoy a wonderful Earth Day this year. I just looked at the weather forecast and a little sunshine is promised, so hopefully I can get out and enjoy some of what mother nature has to offer. Go check out all of the other posts at Outdoor Wednesday at A Southern Daydreamer's place. I know there will be some pretty stuff!

Thursday, April 15, 2010

Flashback and Foodie Friday ~Sopapillas


We had taco salad tonight..always a happy time in our household. Which got me thinking about an old favorite recipe for a Mexican treat, Sopapillas. I am almost (but not quite) embarrassed to say that my first sopapillas were eaten at the smorgasbord all you can eat make yourself sick buffet style Baton Rouge restaurant called Pancho's.


Now Panchos was a starving (or just plain poor) college students dream. For a very modest flat fee you could make your way down a cafeteria style food line picking as much of any dish that caught your fancy. If that didn't fill you up you raised a little Mexican flag at your table and the waitress came along to take your additional fat filled orders. One thing that I ALWAYS raised my flag for were the sopapillas that were available for dessert. With honey and butter...yummmmmm and Ole!


At some point I found a recipe to make these little pieces of dough heaven at home. Not sure where it comes from but its simple and good. I had forgotten about the secret ingredient!

Sopapillas


2 cups all purpose flour
1 tsp baking powder
1 tsp salt
1 egg beaten
3 Tbsp salad oil
1/2 cup beer

Mix dry ingredients. Beat the liquid ingredients together with a fork and add to the dry ingredients stirring with the fork to form a dough. Knead the dough well (It might be sticky) Cover and let sit for 20 mins. Roll thinly on floured board. Cut into 3-4 inch squares or triangles.


Fry in deep very hot oil. Oil must be hot or they won't puff. I actually used only a couple of inches of oil which is enough to cook them, but it burns quickly too. They start small...


And stack up quick! These are best right after you make them so eat up.


Serve with butter and honey. First you rip their little heads off...


Slather with butter and pour honey in the hole.


Thank you for allowing me to take this little stroll down memory food lane. If you have a flashback to share...anything from your past even a favorite post...link up here and give me a little shout out in your blog.


I am also joining in with Foodie Friday today over at Designs by Gollum. Check it out HERE!

Sunday, April 11, 2010

~Spring Love~


I just love this time of the year. Everything is fresh and new


And the colors are so vivid


The lamium is blooming (these and the two above)


This cute little ranunculus that my friend Karen gave me appears - it will disappear later


Plants that I had completely forgotten about make theirselves known, like 'Spring Symphony' Tiarella


Shrubs and trees start putting on a show. This pink flowering currant is so pretty at this time of the year


This Vine Maple looks especially cute with its new frilly foliage


Even the foliage plants are especially colorful like this Red Wing Euphorbia


The spring bulbs are still looking nice including this Snowflake


This early purple leafed corydalis brings some blue to the garden


And just in the past couple of days the rockcress has begun to bloom such a pretty pink. Its a great spring blooming perennial and growing it from seed is very easy.


And look what has just begun to open - the first clematis of the season - variety unknown to me but the vine is loaded. Can't wait to see the whole thing in bloom. It's right outside my front door.


Another thing I love about Spring is that I get motivated to grill outdoors. Today I did country ribs, sausage & Raspberry Chipotle glazed chicken. I made potato salad and tried a great new Garden Slaw with Spicy Asian Dressing.


The Raspberry Chipotle glazed chicken was inspired by my friend Carol at There's Always Thyme to Cook who has raved about her Cherry Chipotle Wings. Go check out her site..she's always cooking up something good. I didn't have any cherry jam on hand so substituted Raspberry and it came out delish.

Chipotle-Raspberry Barbecue Glaze
Inspired by Carol who got inspired by:
Source: Food and Wine Magazine - June 2005, recipe by Grace Parisi,

2 tablespoons unsalted butter
1 medium onion, finely chopped or sliced
8 ounces Raspberry preserves (3/4 cup) (I used a bit more!)
1/4 cup chipotle chile in adobo sauce (you can deseed and chop but I wanted the heat)
1/4 cup ketchup
1/4 cup cider vinegar

In a small saucepan, melt the butter. Add the onion and cook over moderate heat, stirring occasionally, until softened, 5 to 6 minutes. Add the remaining ingredients and cook over moderate heat, stirring, until bubbling, about 5 minutes longer. Transfer the mixture to a food processor and process until fairly smooth or use immersion blender . Transfer to a bowl and let cool before using. The glaze can be refrigerated for up to 2 weeks.

NOTES : Use this spicy, smoky, sweet barbecue sauce to glaze grilled meat or poultry in the last few minutes of cooking. It can also be served on the side.


Garden Slaw with Spice Asian Dressing
From Midwest Living with a couple of changes
  • 4 cups bokchoy (or other cabbage)
  • 2 carrots, cut into julienne strips or coarsely shredded (about 1 cup)
  • 3/4 cup bite-size strips green, red, yellow and/or orange sweet pepper
  • 1/2 cup coarsely chopped radishes
  • 1/2 thinly sliced red onions
  • Spicy Asian Dressing (recipe below)

In a large bowl, combine cabbage, carrot, sweet pepper, radishes, cilantro, and green onions. Pour the dressing over cabbage mixture. Toss to coat. Cover and chill for 2 to 24 hours before serving. Toss slaw before serving. Makes 6 to 8 side-dish servings.

Spicy Asian Dressing: In a screw-top jar, combine 3 tablespoons rice vinegar or white wine vinegar, 3 tablespoons canola oil or vegetable oil, 2 to 3 tablespoons sugar, 1 tablespoon toasted sesame oil (optional), 2 teaspoons grated fresh ginger, 1/2 teaspoon dry mustard, 1/4 teaspoon salt and 1/4 teaspoon crushed red pepper. Cover and shake well to mix. Makes about 1/2 cup.

***********************************************************************************

So on to dessert!

I now have a new Spring "love" - Rhubarb! I know this is a rite of passage for many people each spring, but its relatively new to me and I've never baked with it. I saw some at the grocery store this week so thought I would pick some up and give it a try. It's such a pretty color! For those southerners out there who might have seen it...it looks for all the world like pinkish red celery. I used a recipe from what's becoming my go to baking book - Heirloom Baking with The Brass Sisters. I think its a classic, but for this Southern Girl it's a novelty! Here is the rhubarb getting all sugared up


And ready for the oven


Strawberry Rhubarb Pie
from Heirloom Baking with the Brass Sisters

Pastry for double crust pie
4 cups chopped rhubarb (1 inch pieces)
1 1/2 cups sugar
1/4 cup flour
1/4 tsp nutmeg
Pinch of salt
1 pint strawberries, sliced, drained on paper towels
2 tablespoons cold butter, diced

Preheat to 400. Prepare a glass pie plate with vegetable spray and cover with foil the spray again (not sure why but I did it and the pie crust cooked well. Roll out dough to fit pan and put bottom crust in. Mix rhubarb, sugar and flour in a bowl and set aside 1 hour. Put rhubarb in a strainer to collect juice. Pour juice into a saucepan and add nutmeg and salt. Cook on medium until juice thickens. Cool 10 minutes. Combine rhubarb, strawberries and juice. Add mixture to pie shell. Dot with butter then add top crust. Brush top crust with beaten egg. Place pie on baking sheet (I didn't do this and it was okay). Bake 30 minutes and check -cover with foil if browning too fast. Bake another 15-20 minutes or until top is evenly brown. Cool pie completely before serving.

*Randy's note: Don't refrigerate and don't eat until the second day. Susan's note: Ya right on waiting until the second day....


I'm joining in for Mosaic Monday over at Little Red House. Go check out all of the cool mosaics!

Monday, April 5, 2010

~Sweet Dreams~

While not in the kitchen or in the garden (not to mention work) I love to squeeze some crafting in. Unfortunately I am a perennial procrastinator. I see lots of good ideas and want to try them...I even buy the materials as is evidenced by my crammed full craft room, but more often than not I lack follow through. But when I saw this crafting technique I'm about to share, I knew it would be almost instant gratification thus eliminating any appearance of procrastination!


I've mentioned before a great blog called The Graphics Fairy where the most wonderful vintage graphics are shared. Karen, who authors this blog has got to be one of the most generous ladies around for sharing these graphics from her own collection. Looks at this hysterical Easter image. You just can't find stuff like this any ole place.


She has a weekly feature called Brag Monday were readers can post blog links featuring crafts made from her free graphics. Last week I was particularly inspired by this post at the Shabby Chic Cottage that described a super easy method of printing on fabric. I couldn't believe just how easy! She's got a great pictorial but it's as easy as this.

1. Stick a piece of copy paper to the fabric you want to print on using spray adhesive.
2. Trim fabric to match paper.
3. Pick your design to print.
4. Stick your paper in printer and hit go!
5. Your done!

Here is the pretty frame I downloaded from the Graphics Fairy


I added my own text


And here is my finished product...using a cheapo document frame my office partner was going to throw in the trash. I have a blank wall and no headboard in my guest room, so thought it might be a nice accent. The fact that my printer was running out of ink helps with that shabby chic look!


I'm going to participate in Brag Monday this week...go check out all of the other creative projects HERE at the Graphics Fairy. The way these crafters use these images will blow you away!

Sunday, April 4, 2010

Happy Easter and Tie Dye Act II

Hope everybody had a wonderful Easter or Passover this week! As usual we ate too much
On the menu....spiral cut ham, pineapple rings,


Best Ever Rolls (Randy's Mom's recipe),


Luscious potato casserole (See recipe HERE),


and a new to me Asparagus with Buttery Bread Crumbs.


We also had deviled eggs that somehow didn't make it out of the fridge! Snack for me tomorrow :-)

Asparagus with Buttery Bread Crumbs
adapted from this recipe found on Serious Eats

1.5 pounds asparagus
1/4 cup extra-virgin olive oil
1 tablespoon champagne vinegar
Zest of 1 lemon
Juice of 1/2 lemon
1 teaspoon Dijon mustard
3/4 teaspoon Kosher salt, divided
Freshly ground black pepper
2 tablespoons butter
1/2 cup dry breadcrumbs
1 clove garlic, crushed with a chef's knife

1. Wash, dry and trim off the woody bottom portion of the asparagus.

2. In a large zip-top plastic bag (if you're an earth murderer like me) or a long, shallow dish, combine the olive oil, vinegar, lemon zest and juice, mustard, 1/2 teaspoon of the salt and the pepper, and crushed clove of garlic. Add the asparagus and toss to coat. Marinate at room temperature for at least 30 minutes, or in the fridge for as long as you like.

3. After marinades, saute asparagus until tender (I added a bit of water to make them more tender).

4. Meanwhile, melt the butter in a small skillet over medium-high heat. Add the breadcrumbs and remaining 1/4 teaspoon salt and cook, stirring often, until the crumbs take on an amber color and smell like you couldn't possibly resist eating them by the spoonful. Serve the asparagus with crumbs sprinkled over top.

There are two Easter traditions that I love...dying eggs and Pocking them. Now I know that most of you know what dying eggs is, but only a handful of you know about pocking. See my Luscious Potato casserole from last year above for details. And stayed tuned below for this years winner. Last year I tried a silk dying method of egg coloring using some old ties that I've collected that produced some pretty cool results so I thought I would give it a try again this year.


Its kind of hit and miss since some of the dyes adhere less than others.


I blew a few of the eggs so that I wouldn't have to throw them away if they turned out. Luckily some of my favorites ended up being the blown eggs. Including this groovy one.


The effect is really neat and on some looks a lot like tye dye


But on others you get a LOT more detail


The shiny shell is simply vegetable oil rubbed on


I wish I knew how to get the fabric on a little smoother because you get white spaces where the wrinkles are


Which can actually create a neat look on some eggs


I guess in a way it adds to the look


I love having a chance to use my Deviled Egg dish


And some of my egg cups


I think the Easter Bunny likes them too


Because he left a few in our baskets


So because the dyes on these eggs are not necessarily food safe (not really sure?) I boiled a few more eggs to eat. I ran out of time so didn't dye these. So the pocking contest was a little dull....especially since I DIDN'T win!!!! Randy won again!!! Dang him.


I'm joining in over at Little Red House for Mosaic Monday! Check it out HERE.
Blog Widget by LinkWithin